Browsing: Tutorial

Exporting Signal Messages to the Android Database

With the recent news that Signal is no longer supporting SMS messages, I found myself wanting to switch to a new sms app, while keeping my message history. The message app i’m switching to is called QKSMS and so far it has been a pretty great (not-encrypted) sms program. However, It doesn’t have my message history from signal, and it’s not as easy as pressing a button to make it happen.

Here is the process I used to transfer most of my sms messages. Unfortunately, there is not a way I know of to transfer MMS messages over. (Group messages and pictures) So it’s not perfect but it does help. First, you need to backup your current Signal message database, and also get the password for it. You can do this in your app Settings>Chats>Backup. Make your backup, and take note of the 30-digit password. It reads Left to right, top to bottom.

Next, you’ll need to grab the latest copy of signalbackup-tools. Move your signal .backup file and the signbackup-tools exe into the same folder on your to make working on them easier. I use syncthing to keep files between my pc and phone synced, but that’s because I already have it set up. you can use a usb cable just as easily.

Run the extraction command of signalbackup-tools on your signal message backup. The github page has lots more details, but we’ll need to use the following command to make import into android possible;

.\signalbackup-tools_win.exe C:\Users\user\Documents\signal-2022-10-28-15-53-22.backup 111112222233333444445555566666 –setselfid 9998885555 –exportxml signalsmshistory.xml

Make sure to adjust the location, backupfile name and password to match your setup. Also make sure to changed the selfid number to your phone number. If all goes well, you’ll end up with an xml file with all of your sms history in it. Once you have this file, copy it back to your android phone.

Before you can start using your news sms app, you’ll need to import your new xml file into the android database. I used SMS backup and restore. Install and run the app, then choose the xml file you made with the signalbackup tool. Let it import your messages.

For the last step, in the QKSMS settings page, at the bottom, there is a sync button you can press. This button imports all the messages from the android database and into QKSMS. You should now have all of your signal messages imported into your android messaging history.

{ Comments are closed }

WPA Password Verification Tool

I was going through my computer projects and realised that I never shared this one on my website. It’s a tool, coded in C++ that checks a text file for WPA/WPA2 password compatibility. It is most helpful in network security applications / pentesting when you have a password list and aren’t sure just how much of the list is actually a legitimate password.

For example, we have a text file with these contents:

Good Password
good password

Good Password 1234567890
good password 1234567890

GoodPassword
goodpassword

BadPass
badpass
badpa55

badpas™
BadPas™
B3dPas™

This is a bad password because the character length is way above the maximum limit of 63 characters, and WPA won’t allow such horrible things to exist in the first place anyways.

If we run the tool on it, we get these results:

A picture of the tool in action


Finally, here is the source code of the project. It should be able to be compiled with just about any compiler on any operating system.

#include <iostream>
#include <fstream>
#include <string>

int help(char *argv[]) {
std::cout << “Usage: ” << argv[0] << ” <PasswordFile> [Options]” << std::endl;
std::cout << ”  Options:” << std::endl;
std::cout << ”    -wpa  Verify password list using WPA Rules (WPA uses same rules as WPA2)” << std::endl;
//std::cout << ”    -clean    Automatically delete invalid passwords from file” << std::endl;
std::cout << ”    -goodlist Print all valid passwords” << std::endl;
std::cout << ”    -badlist  Print all invalid passwords” << std::endl;
std::cout << ”  Example:” << std::endl;
std::cout << ”    ” << argv[0] << ” passwordlist.txt -wpa -badlist” << std::endl;

return(1);
}

int does_exist(char *filetouse) {
//first check to see if the cfg file exists
FILE * pFile;
if(pFile = fopen (filetouse,”r”)) {
//the file exists
return(1);
} else {
//the file doesnt exist
return(0);
}
}

int verify(int argc, char *argv[]) {
//variables for later usage
//booleans for user options
bool wpa = false;
//bool clean = false;
bool goodlist = false;
bool badlist = false;
//strings for file reading
std::string password;
std::ifstream infile;
//strings for password statistics
int numberoflines = 0;
int numberoftolong = 0;
int numberoftoshort = 0;
int numberofbadchar = 0;
int numberofgood = 0;
int numberofempty = 0;

const char *filetouse = argv[1];

//check all the options
for (int i = 0; i < argc; i++) {
//options are -wpa -clean -goodlist -badlist
std::string options[4] = {“-wpa”,”-clean”,”-goodlist”,”-badlist”};
if(argv[i] == options[0]) {
wpa = true;
}
/*if(argv[i] == options[1]) {
clean = true;
}*/
if(argv[i] == options[2]) {
goodlist = true;
}
if(argv[i] == options[3]) {
badlist = true;
}
}

//read the file line by line and check to see if the passwords are right
infile.open(filetouse); //open the user file
while(getline(infile, password)) { //while not the end of the file
//getline(infile,password); //read the current line to std::string password

//count the lines in the password field
numberoflines += 1;

//check password
if(wpa == true) { //if checking WPA Rules
if(password == “”) { //empty line
//skip empty lines
numberofempty += 1;
} else if(password.size() > 63) {
//password is to big to be used
if(badlist == true) {
std::cout << password << std::endl;
}
numberoftolong += 1;
} else if(password.size() < 8) {
//password is to small to be used
if(badlist == true) {
std::cout << password << std::endl;
}
numberoftoshort += 1;
} else if (password.find_first_not_of(“!\”#$%&'()*+,-./0123456789:;<=>?@ABCDEFGHIJKLMNOPQRSTUVWXYZ[\\]^_`abcdefghijklmnopqrstuvwxyz{|}~ “) != std::string::npos) {
//password contains a bad character
if(badlist == true) {
std::cout << password << std::endl;
}
numberofbadchar += 1;
} else {
if(goodlist == true) {
std::cout << password << std::endl;
}
numberofgood += 1;
}
}
}
infile.close();

std::cout << “Checked ” << numberoflines << ” passwords.” << std::endl;
std::cout << ”  ” << numberofempty << ” lines contained no text” << std::endl;
std::cout << ”  ” << numberoftoshort << ” lines were to short” << std::endl;
std::cout << ”  ” << numberoftolong << ” lines were to long” << std::endl;
std::cout << ”  ” << numberofbadchar << ” lines contained illegal characters” << std::endl;
std::cout << ”  ” << numberofgood << ” lines contained good passwords” << std::endl;

return(0);
}

int main(int argc, char *argv[]) {
if(argc <= 1){ //not enough options so help is shown
if(help(argv)) {
std::cout << “Fatal error. Quitting program.” << std::endl;
return(1);
} //else program is working fine
} else { //plenty of options, better check to see if they are the right ones
if(argv[1] == std::string(“help”)) {//display help
if(!help(argv)) {
std::cout << “Fatal error. Quitting program.” << std::endl;
return(1);
} //else program is working fine
} else {
if(does_exist(argv[1])){
verify(argc, argv);
} else {
std::cout << “Invalid file” << std::endl;
}
}
}
}


{ Comments are closed }

Installing / Running The Linux Autotyper

It was recently brought to my attention that I do not have clear instructions for installing the linux autotyper. Well, this post fixes that. So without further adieu, the instructions.


1: First, you need gambas2 installed. I may have a script fixing this later, but not right now. To install gambas2:

1a: Open the terminal by pressing “ctrl” and “Shift” and “t” on your keyboard at the same time.

2: Enter this code in the terminal (command prompt for you new-to-linux people)
sudo apt-get install gambas2

You may or may not have to press ‘y’ to confirm that you want to have gambas2 on your system.

3: Download the latest version of the linux autotyper by clicking this link:
Download here.

4: Extract the downloaded zip file to your desktop.
5: Browse to the extracted folder on your desktop, and open it.
6: Open the folder called “Executable”

7: there are two files, DaGeek247s_Autotyper,gambas, and readme.txt.
Make DaGeek247s_Autotyper.gambas executable.

{ Comments are closed }

Ubuntu Templates

Ubuntu templates, the one thing they always forget to add in the release. Sure you can add your own, but that’s always a pain to do yourself. But first, an explanation for the newer ubuntu users.

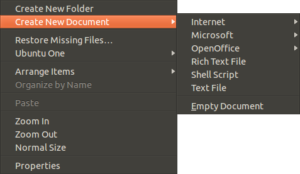
Whenever you right click on a folder or the desktop in ubuntu, you are given the option to to create a file. If its a new install, it will almost certainly tell you how it doesn’t have any templates installed. The simple fix is to go to the ~/randomuser335/Templates folder and make some files, and most of us do.

However, doing that with every new release is a pain, so i spent about thirty minutes setting up a whole bunch of files and adding them to a file to share with everyone else. Now, you just need to come here and get my file, and copy its contents to your own templates folder.

Last thing, and i’ll give you the templates link. Every folder in the templates folder is a new sub-menu in the ‘create file’ menu. every file you put in the templates folder is just copied when you use the create new file menu. So here is an exemple of the sub-menus;
Finally, here is the link to my templates. Just extract the files to the ~/username/Templates/ folder and you can use them instantly. //dageek247.com/wordpress/wp-content/uploads/2011/10/Templates.tar.gz

{ 1 Comment }

Restoring gnome panels to their defaults

Quite frankly, this happens to many times to ignore. You are messing around with ubuntu and oops! you deleted, or misplaced something on the panels. Maybe you booted up your computer and something on the panels somehow is ruined, through no fault of your own. this often happens to me, so it seemed necessary to put it here, even though there are plenty of other sites saying the same thing. Here is a probable messed up panel screenshot:

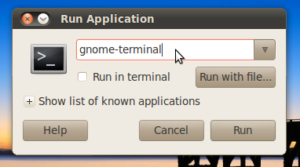
First, you need to open the terminal. The easiest way to do this, is to go to Applications>Accessories>Terminal, but not everyone has the luxury of working panels. You can also open the terminal by pressing ALT+F2 and then typing ‘gnome-terminal’  in the resulting dialog box. This is what it looks like:

next, you need to type a few commands into the terminal. First, copy/paste this in:

gconftool – -recursive-unset /apps/panel

the above command prepares the computer for the next commands and allows you to delete the settings files.. now type in the below command:

rm -rf ~/.gconf/apps/panel

The above command deletes all the settings for the gnome panels and allows them to be automatically reset by the system to their defaults.. finally, copy/paste this in:

pkill gnome-panel

The previous command stops the system app running the gnome panels, allows the system to restore the settings to their defaults, and starts the panel back up. if you did not delete the settings with the rm -rf command, this would have just restarted the gnome panels. And for those of us who don’t care and just want their panels reset quickly, you can copy/paste the below command into the terminal, and it will have the same effect.

gconftool – -recursive-unset /apps/panel; rm -rf ~/.gconf/apps/panel; pkill gnome-panel

That’s it! the gnome panels had all their settings reset to factory default, and you can now look at your proper panels and use them like they are supposed to be, here is even a screenshot of mine after they were fixed:

{ 3 Comments }

Grub Bootloader

Many of you should know about it, its the thing that lets you choose which operating system to run, and then starts it for you. Its also what can almost stop a computers usability with a few clicks of a button. You have probably also had problems with it in the past, maybe a dead os listing, maybe not all the oses are there, or something more serious.

I know people who think the solution to whatever bug or problem in grub is to reinstall the machine. If you are thinking of doing this, don’t. The easiest thing to do is get a live cd and fix the grub issues there. Here is even a good tutorial on how to do so:

If grub was overridden by a new install of windows or if grub has an incorrect/missing boot item:
//www.robertbeal.com/562/rebuilding-grub2-grub-cfg-from-ubuntu-live-cd

You can fix the random errors that you have no idea how they got there by reinstalling grub, and if that fails, you need a new pc, because reinstalling grub is the same as reinstalling everything on your pc to fix grub.

So please, for the love of grub users everywhere, don’t format everything to fix grub, use a liveCD to fix it instead.

{ Comments are closed }